|
<< Click to Display Table of Contents >> Importing from the Key Schedule Tool (CSV) |
  
|
|
<< Click to Display Table of Contents >> Importing from the Key Schedule Tool (CSV) |
|
For your convenience, we've included this importing tool as an alternative method to import your building information data. The tool was first designed to create a customer's order for the Factory. This file may contain keys, hardware cylinders, other hardware products, and the building information for assignments. After the data is entered into the spreadsheet, it can then export a file (.csv) that can be imported into SITEMASTER 200®. This feature was designed to be used in conjunction with an Allegion Registered Key System that is imported prior to the Key Schedule Tool file.
Attention: If you decide to use the feature in this file to make a distinction between any Primus and non-Primus keys, if any, then you will most likely need to continue to use the feature as you go. For example, you import a second Allegion key system file in order to expand your key system. In order to distinguish between those keys for Primus, you will have to rely on this tool to add the new building information and to make the Primus distinction for the new key numbers. Otherwise, you will need to handle this manually in the SiteMaster program.
This topic includes:
Working with The Key Schedule File Headings
Additional Instructions and Guidelines
Important: Before you import any file into SITEMASTER 200®, do the following:
Make a backup of your data for safety purposes in case there's something wrong with the import file.
See, Backing up your Data.
Working with The Key Schedule File Headings
Important: The Key Schedule Tool comes with its own instruction for using it with SITEMASTER 200®. Below, the headings to the left of the equal sign are from the Key Schedule Tool file and to the right are from SITEMASTER 200®.
Locking Device = Product Part Number. One hardware product such as a lockset can be added. This will be added to the Products Screen and assigned to the door(s) if any. Note: The hardware cylinder is handled by the Product Number listed below.
Door # = Door Number.
Key Symbol = Key Number/Key Symbol/Cylinder Core. All Key Number records will be assigned either an “X” in the Pri or Non-Pri field. If there is either “0 Bitted” or “1 Bitted” in this field then we are adding a hardware cylinder product that may also have a door assignment. This will also add a Key Number and Cylinder/Core with the same name. This cell can also be left blank when adding products or building information without key assignments.
Selective Symbol = Cylinder/Core name extension. Adds the Selective Symbol(s) to the Cylinder/Core name. For example, AA1(ENG). When importing an Schlage Key System File (.doc), the selective symbol names must match those that are used in the key system file.
Qty = Product Quantity. Applies to both products and cylinder products. If a Cylinder Product, then marked by an “X” or “*” in either the Pri or Non-Pri column. The quantity should only be one (1). If you have two cylinders for the same door, then create a second row record for that door.
Product Number = Product Part Number. This will be added to the Products Screen and assigned to the door(s) if any.
Pri = A marker (X) for assigning the Primus keys and cylinders. If there is a hardware product listed then this marker (X) creates the hardware product as a cylinder product in SiteMaster. Same for Non-Pri.
Important: For records marked with the Pri "X" > During the import, SiteMaster automatically adds the Primus "P" designation to the end of the assigned keyway for both key numbers and cylinder/cores, but you must check the option "Include Primus Designation on Keyways." For example, if "Pri" is marked with an X then C145 becomes C145P in SiteMaster. If you don't want the Primus keyway assigned, then do not check the option.
Attention: You do not need to create the primus keyways in order to make a distinction between Standard and Primus key numbers in SiteMaster. The distinction is already made when you import your Allegion registered systems into SiteMaster. This is designed, so you import the non-Primus system into
Non-Pri = A marker (X) for assigning the Non-Primus keys and cylinders.
Room Function = Function
Room # = Room Number
Description = Door Description
Building Name = Building Name
Keyway = Keyway > Standard keyway listed for both Primus and Non-Primus keys on the Key Schedule. In Sitemaster, the "P" designation for Primus is automatically added to the end of the keyway (i.e., C123 becomes C123P) if the Create Primus Keyway(s) as Specified box is checked on the import screen.
Manufacturer = Manufacturer
Department = Department
Headings for creating key quantities:
Important: Cut key quantities are "additive" to the Total Keys Created field in SiteMaster. For example, if you import the file twice you will double the created quantities. Follow the directions that are built into the Key Schedule Tool to use this feature. The cut key quantities are created when building the customer's order.
Pri Cut Key Qty = Create key quantity for Pri Cut Key Group.
Pri Cut Key Group = Key Number for cut key create quantity.
Non-Pri Cut Key Qty = Create key quantity for Non-Pri Cut Key Group.
Non-Pri Cut Key Group = Key Number for cut key create quantity.
Helpful Information:
When adding "0 Bitted," and "1 Bitted" cylinder products to SITEMASTER 200®:
The file can be used to add these products and to mark them as cylinder products in the program whether or not you're assigning them to doors. After importing, SiteMaster adds the hardware cylinder(s) to the Products Screen, and also adds the "0 Bitted," and "1 Bitted" names as Key Numbers and Cylinder/Core records. When these records are assigned to doors, they can be re-keyed later in SiteMaster after re-pinned/replaced by the Service Provider. Use an "X" to mark these as cylinder products in the Pri or Non-Pri columns.
When assigning Selective Masters:
If the Allegion Key System File contains Selective Masters then you may use the Selective Symbol column in the Key Schedule Tool File to assign any selectively keyed cylinders to doors. What's important is that the names of the Selective Masters match exactly in both files. In a situation where more than one Selective Master operates a cylinder, separate the selective master names with a comma(s) and no spaces.
Critical: This import is designed to work in conjunction with an Allegion Key System file (CSV). The Allegion Key System file adds the keys and their bittings to SITEMASTER 200®. When importing the Key Schedule Tool File afterwards, the program looks for matching records and makes the assignments. When using the import screens for each file, make sure the same Key System is selected for both of these imports. Additionally, make sure that the Import Keys as Serialized Checkbox is the same for both imports. First, import the Allegion Key System and then the Key Schedule.
Important: First, make a backup of your data for safety purposes in case of unexpected results.
First import the Allegion Key System file, or you should already have keys and cylinders in SiteMaster that match those in the Key Schedule Tool file.
1. In the Key Schedule Tool file, click the Save As Sitemaster Import button to create the file.
2. From the Utilities pull-down menu in SITEMASTER 200®, select Import/Export Utilities and then Load Records from Key Schedule Tool.
3. On the Load Records from Key Schedule Tool screen, use the browse button for File To Import to look up and select the import file. It must be a CSV.
4. If the End User's keys are serialized then check the Import Keys as Serialized box. NOTE: If the Key System file from Allegion was serialized for keys, then make sure to check the serialize option. Both files should be checked/unchecked the same way for this option or you may wind up with two sets of keys.
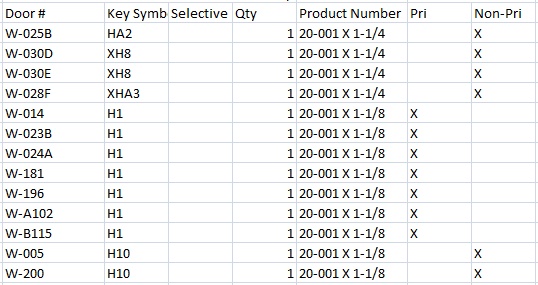
5. Check the Include Primus Designation on Keyways option if you want the program to add the Primus Keyway designation "P" (e.g., C125P) to your key numbers and cylinder/cores as specified in the Key Schedule Tool file (Pri = X). For example, if you have a Downward Compatible System then this will create the distinction between your standard and Primus keys and cores. If you don't check the box then the "P" designation will not get added, so the keyway(s) for all your key numbers and cylinder/cores will not be changed. For example, you don't need to check the box if your system is 100% Primus. See Fig. 1
Fig. 1 - If the Create Primus Keyway(s) as Specified box is checked then the H1 Key Number and Cylinder/Core records will receive the "P" keyway designation.
6. From the Manufacturer's System field, select the Manufacturer's System type to load the keys and cores.
7. From the Key System field, use the drop-down button to select the Key System to load the keys and cores. If you added more than one Key System under the same Manufacturer's System then you may need to select a different Key System than the one displayed.
8. If necessary, you can change the Warranty Start Date for the door hardware that's being imported.
9. Click the Finish button to start the import.